Arduino 搭配 電容式土壤濕度感測器 量測土壤濕度
您將學習如何將電容式土壤濕度感測器連接至 Arduino 並解讀其讀數。本專案包含使用 Arduino 讀取感測器的模擬輸出,並了解讀數較低時代表土壤濕度較高。透過提供的範例程式碼,您將獲得處理模擬輸入與序列通訊的實務經驗。
在此專案中,我們需要以下元件:
- Arduino 開發板(如 Uno)
- 電容式土壤濕度感測器模組
- 面包板
- 跳線
購買整組套件會更加方便,以下是購買連結:https://www.taiwansensor.com.tw/sku/SNT-005707
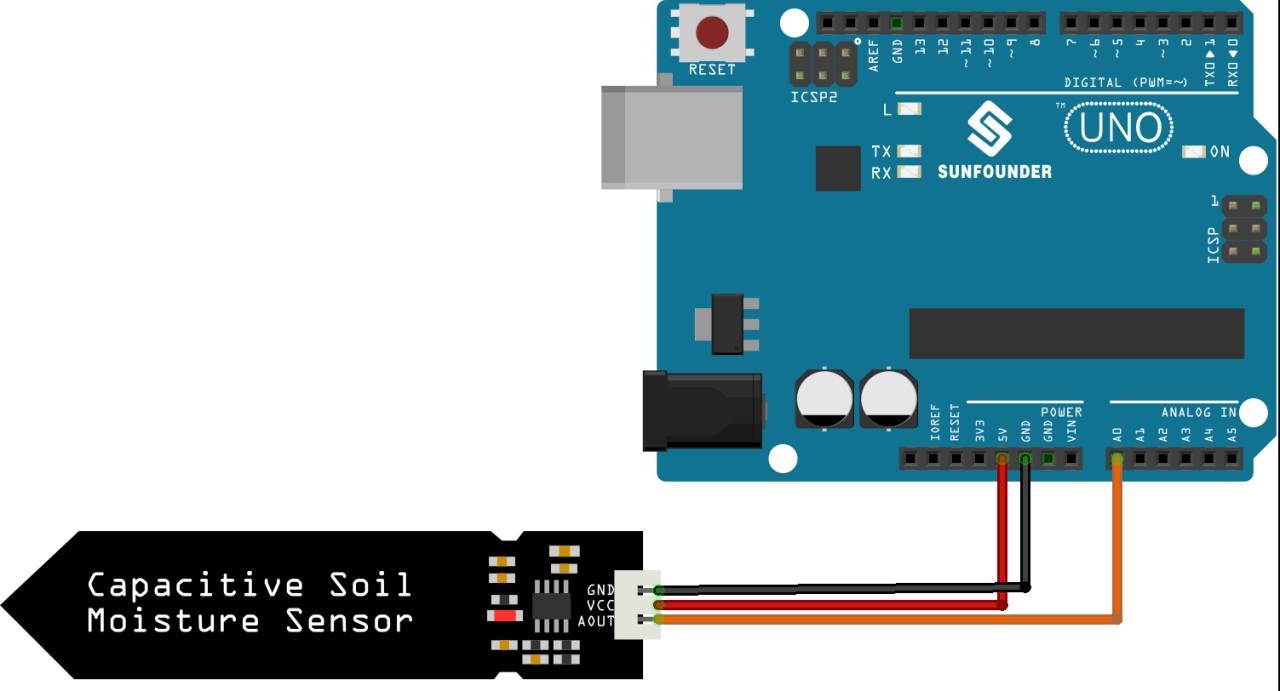
接線方式

程式範例碼
1 2 3 4 5 6 7 8 9 10 11 12 13 14 15 16 17 18 19 20 |
/* This program reads the analog input from a capacitive soil moisture sensor connected to pin A0 and prints the value to the serial monitor. The smaller the value, the higher the soil moisture level. Board: Arduino Uno R3 (or R4) Component: Capacitive soil moisture sensor module */ // Define the sensor pin const int sensorPin = A0; void setup() { Serial.begin(9600);// Initialize serial communication at 9600 baud rate } void loop() { Serial.println(analogRead(sensorPin)); // The smaller the value, the higher the soil moisture level delay(500);// Wait for 500 milliseconds before taking the next reading } |
程式碼分析
定義感測器引腳:
這行程式碼宣告一個常數整數sensorPin並為其分配 的值A0,該值是感測器連接到的類比輸入引腳。
|
|
const int sensorPin = A0; |
設定功能:
該setup()函數在程式啟動時執行一次。它以 9600 波特率初始化串行通訊。此設定對於將資料傳送到串列監視器是必要的。
|
|
void setup() { Serial.begin(9600); } |
循環功能:
該loop()函數在 後連續運轉setup()。它使用 A0 引腳讀取感測器值analogRead()並將該值列印到串行監視器。該delay(500)語句在下次讀取之前將循環暫停 500 毫秒,從而控制資料收集的速率。
|
|
void loop() { Serial.println(analogRead(A0)); delay(500); } |


發佈留言
很抱歉,必須登入網站才能發佈留言。